Jan 032021
 

This is an attempt at a bot design that’s driven and steered by only one servo. I have no justification for this other than it seemed like it had to be doable.

I’m absolutely sure a single servo actuated steering\drive mechanism exists somewhere, but I couldn’t find any. I’m guessing the designs that do exist are for very specialized applications where some factor makes using only one servo desirable. Using two 9g hobby servos for any reasonable DIY application is pretty much as easy as using one, so there’s really no advantage in the added complexity of the linkages at all.

But despite it being a fundamentally pointless idea, I couldn’t get rid of it. A servo set up as a rear paddle of a canoe could control direction and momentum so why not a wheel? I thought about doing something like a ‘wheel paddle’ that would work a bit like a skate, pushing laterally to roll forward and varying the angle to each side to control direction, but that seemed like a copout somehow so I thought about more classic wheel\axle setups. This design is optimized for simplicity- lol… what that means is this is the minimum effort required to satisfy my weird compulsion to demonstrate this is possible, knowing I have no intention of taking it any further than that.

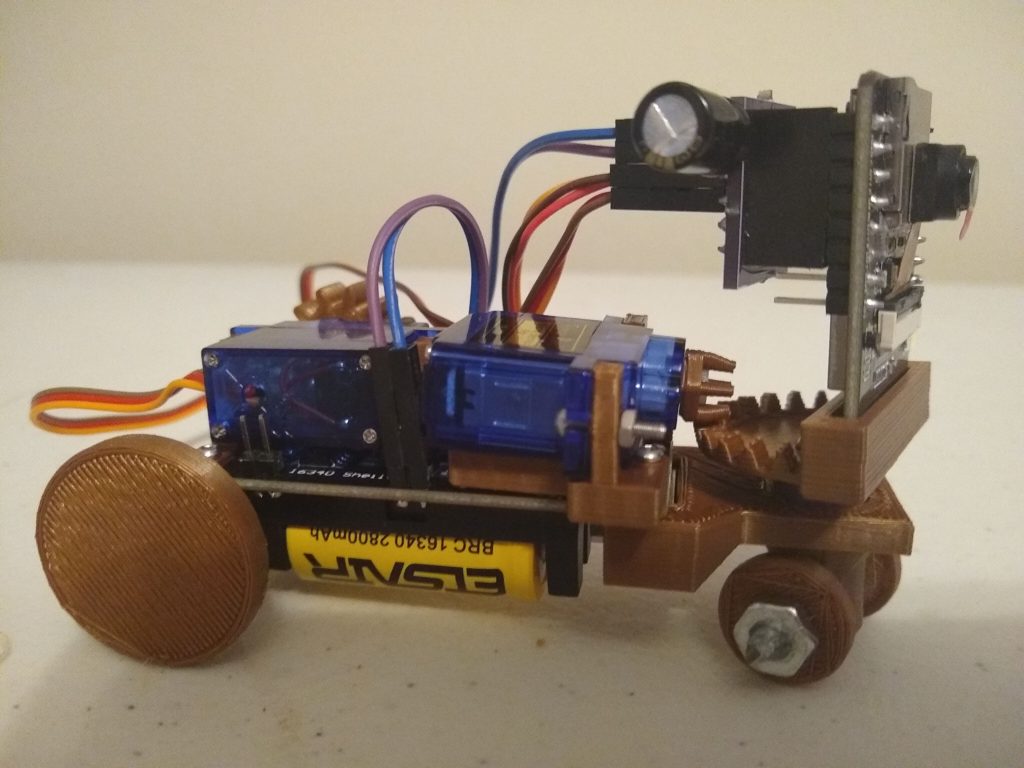
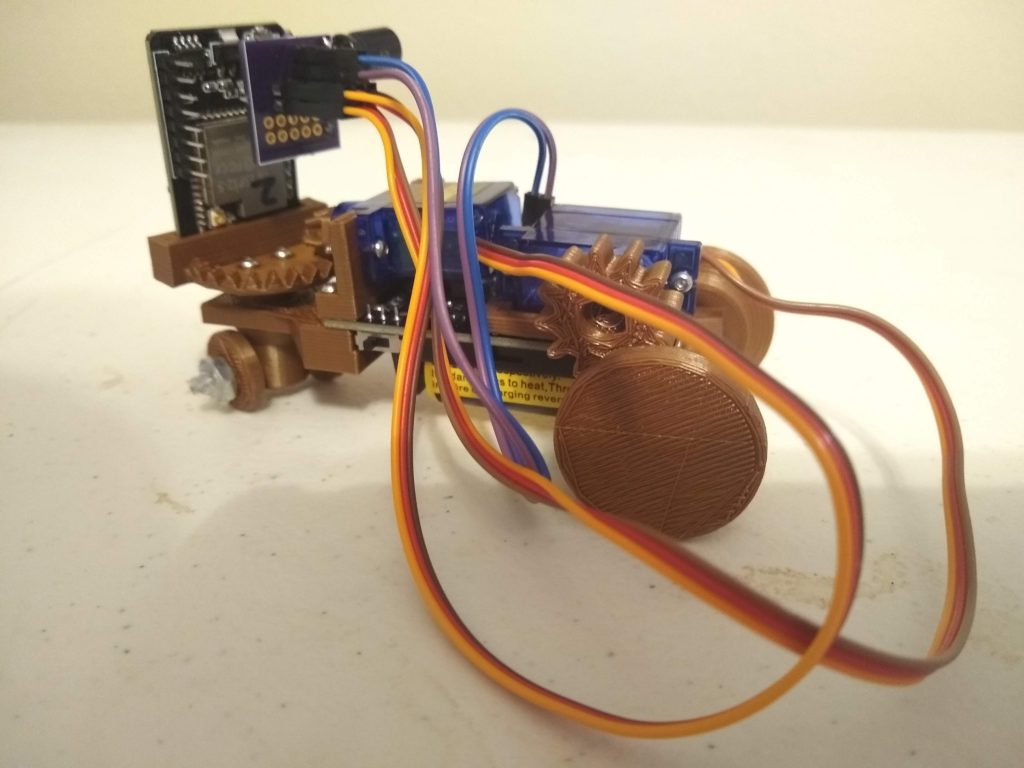
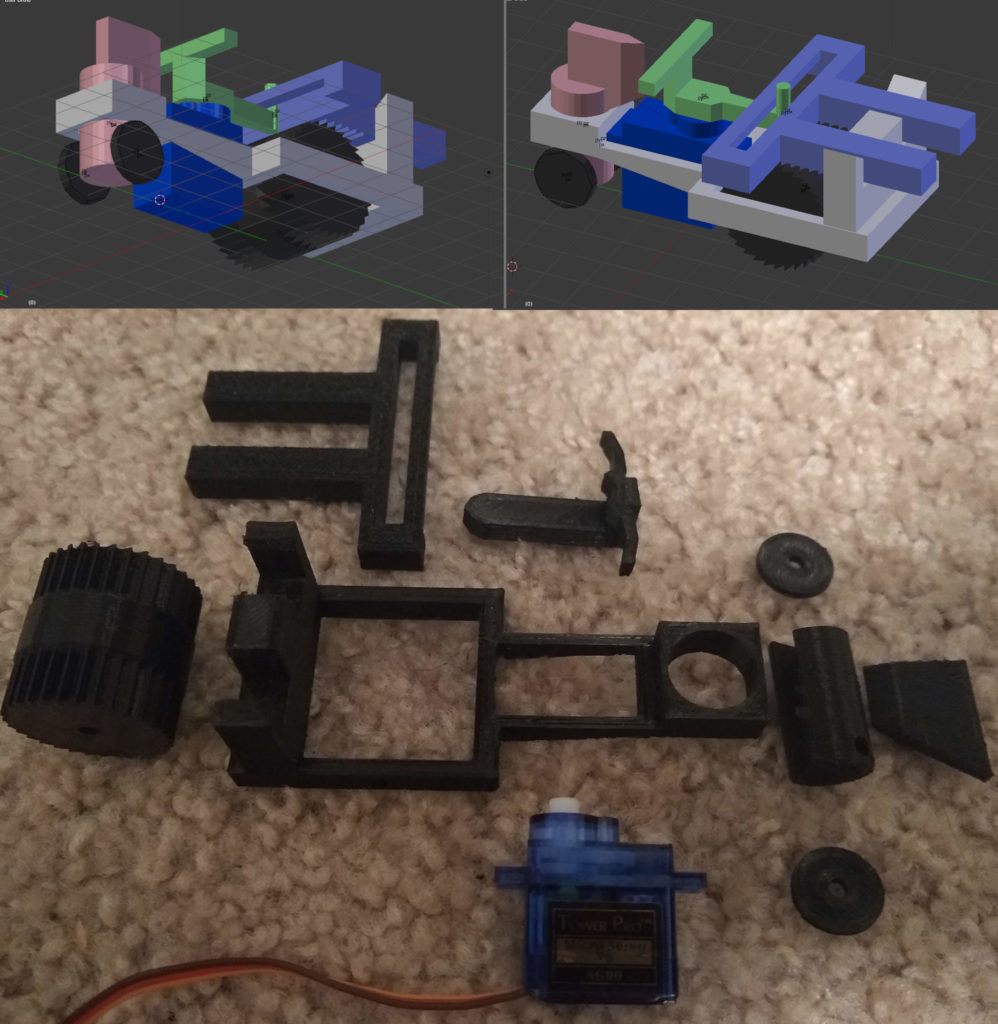
So the drive is a kind of rack and pinion thing with the teeth angled to turn the wheel on only one stroke direction. I should have used a little ratchet catch but didn’t. I’d seen more complex ‘mechanical rectifier’ setups that could drive on both strokes, but meh. I went with the T bar steering setup so you could kind of ‘set’ the direction and just work the servo around it so you can go straight and make smooth turns. Other options were to keep the steering connected to the servo but that would force it to always move in a serpentine pattern.

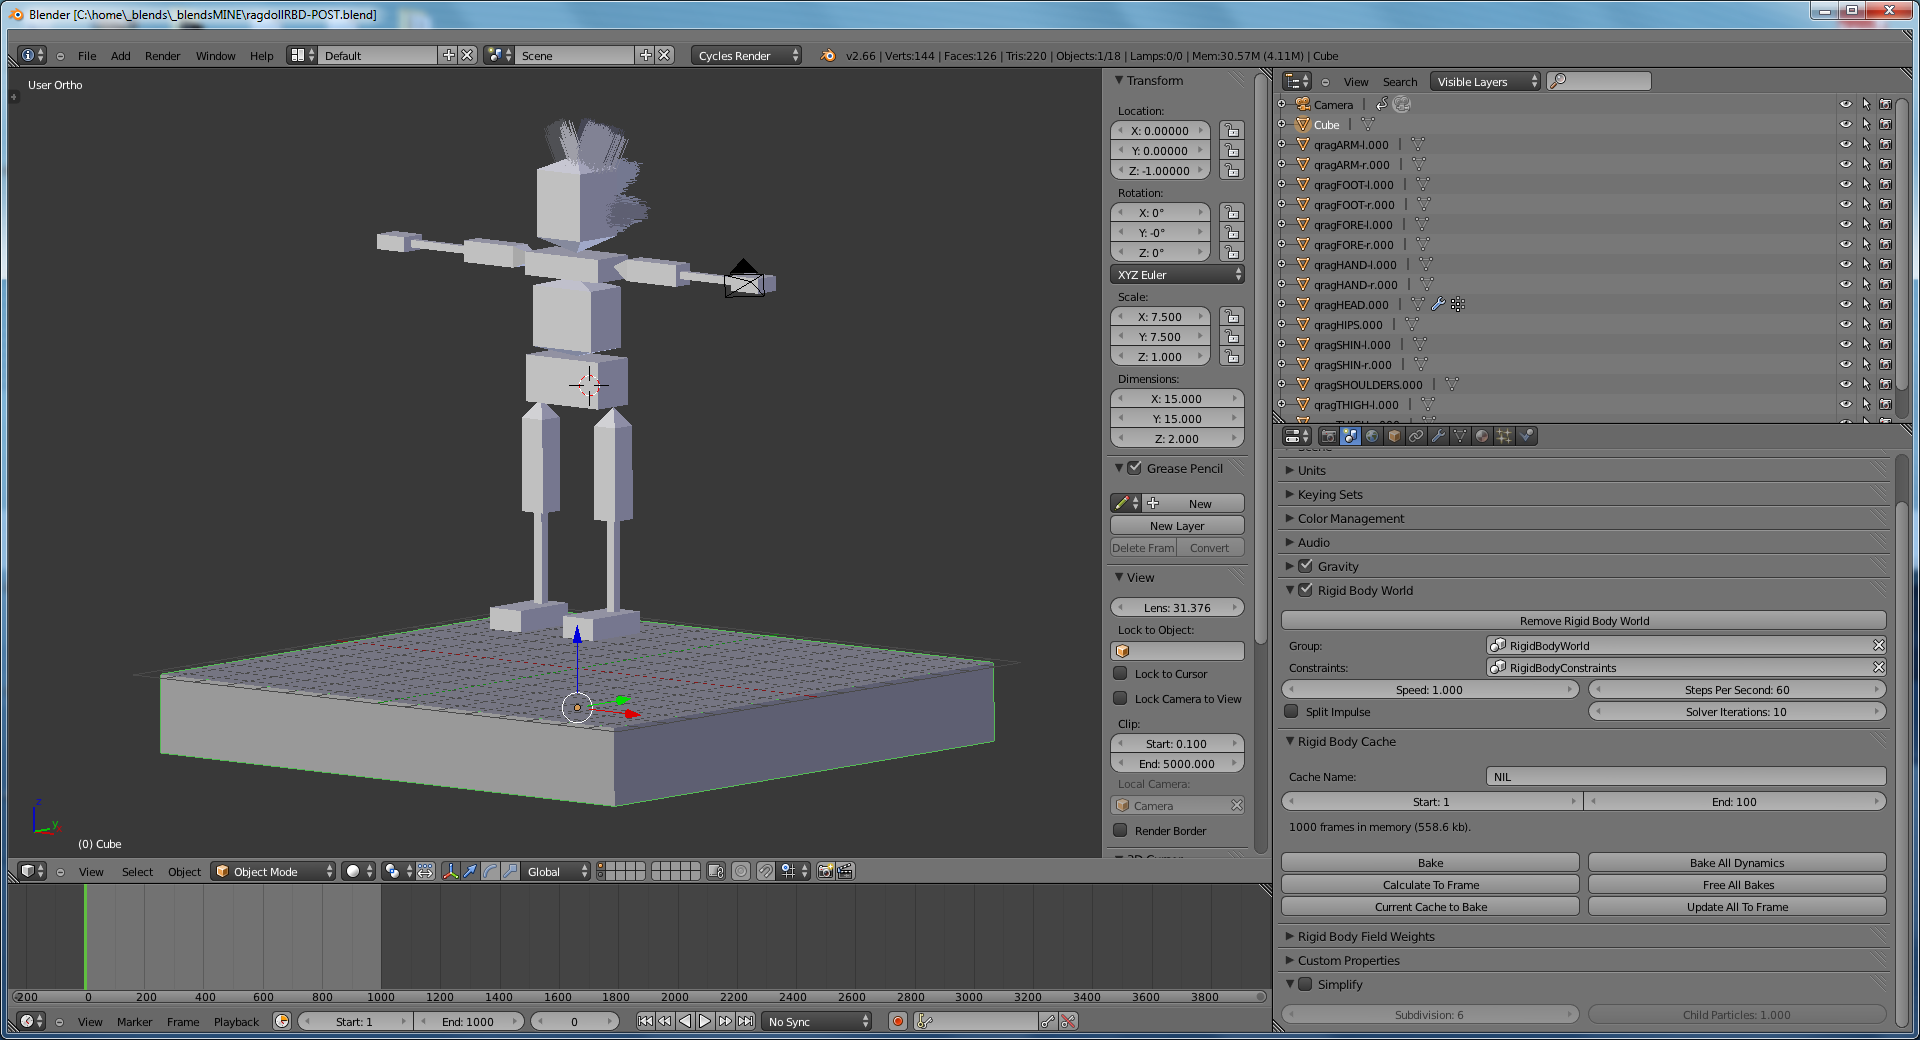
The video is a bit of a disaster. I tried to create the mechanism in the blender game engine using rigid body dynamics but I’m about 5 years out of practice with that program and forgot a lot so I just kind of winged it. The simulation is clearly jacked. The gear wheel doesn’t work right because I couldn’t figure out a directional rotation constraint and friction is wonky in the bge. Everything kind of floats, it’s awful, but I think it shows the functionality I wanted it to show and that’s the whole point of this pointless thing. I also tried to 3d print it, but… yeah- lot of quick-n-dirty solutions in the game engine version didn’t translate to matter so it didn’t really come together. But since I spent the time and the PLA I put it in the video too.

This obviously wasn’t a success, but I don’t think I can call it a failure either. Like a lot of my projects it kind of works in a way and if someone with more skill and determination took a stab it could probably be cool little demo thing. Anyway- it’s something I did so I could stop thinking about doing it so now I guess I’m done and I can do another thing.

Jan 022021
 

This is just a little housing idea for an ESP32CAM and AM312 PIR sensor
A small section of 2″ PVC and PLA printed holder. Pretty simple and sturdy.
I’m using this indoors with hass.io, but the PVC housing might be a good basis for exterior cameras too. I’m working on adding a battery module and using deep-sleep modes to make long-term time-lapses but this worked out pretty well so I figured I’d post it.

Here are the STLs:

May 142020
 

UPDATE: Pretty much resolved the stability issues with the ESP32CAM and posted it on github – https://github.com/funkboxing/espcreep

Here is the first semi-functional build of a bot type thing I’ve been working on. I’m calling it ESP Creep, because it’s ESP based and it kind of creeps.

ESP Creep demonstrating how poorly wheeled vehicles perform without friction.

It was made to have a minimum part count and be simple to assemble and control. I’d like these to be available for anyone who wants an extremely inexpensive robotic camera platform. I always envisioned some kind of desktop multi-bot ‘soccer’ platform to help learn and play with vision control systems and such, but there weren’t any cheap-o bots that really fit the bill. This isn’t ready for much except more development, but it does most of what I intend it to do, albeit very poorly, so I figured I’d share.

Here are a couple of obligatory glamour shots of the bot. Just look at those unnecessarily long, flowing servo leads… majestic.

These are the parts involved, sans 3d printed parts and a half-dozen 8mm m2 screws.

~ESP32CAM
~SG90 Hobby Servo (Angle)
~SG90 Hobby Servo (Continuous Rotation)
~16340 Battery Module and battery
~1000uf (6.3v) Electrolytic Capacitor
~Breakout PCB and Connectors.

The PCB breakout is the only custom part, and it’s not strictly necessary, just very convenient.

I chose not to do the traditional differential drive. I’m not entirely clear on why I didn’t want to, but I’ve rationalized it with a few apparent advantages. One it’s just easier to handle control wise. There’s no need for ‘mixing’ turn and throttle variables into the motor values. This just makes it +/- for drive, and +/- for turn. Also you don’t have to calibrate motor speeds to make the thing go straight. Mounting the motors for differential drive seemed to make the bot footprint larger, or wider at least. Also I like that it makes steering pan the camera. And I can’t always find continuous rotation motors and I hate modifying angle servos.

Obviously the next step in the 3d design is to get some friction happening on the wheels, and tighten up the wiring situation.

The big problem is the ESP32CAM software. It serves up the camera and parses UDP packets to command the servos. You can see in the video at the end the connection drops. It does that about 30 seconds after you connect. Sometimes I can reconnect right after, but sometimes I need to reboot the ESP. I know the ESP32CAM can be fairly stable because I have several running esphome on hass.io. But I cannot get these things to stay connected with Arduino based code. Some of it might be the motor power demands, the ESP’s are a little finicky with power, but it’s not consistent with motor power, it drops when it’s just sitting there. I added a big honking cap that I think resolves any brownouts but I don’t think the ESP is rebooting because I can still ping it right after it drops the camera connection. I can’t get any error output when it’s connected to serial that gives me any clue what’s happening. But I’ll keep working on it, I’d love some help if anyone ESP savvy has any ideas.

Here are the files. These are not really well organized. It’s everything you’d need to recreate this bot, but it’d take a pretty handy person to get it all working. I would love it if another DIY nerd wanted to jump into this, especially the ESP32CAM arduino sketch. Fair warning this is terrible code and I express my frustration in comments and variable names. Also I can’t find the stencil files for the PCB right now, but I got it made by OSHPark so they’re still up there. Eventually I’ll get more and maybe sell them in kits or something, but if anyone wants them just let me know, I think I can get the files from OSH. Also it’s just breaking out power and data for the servos so anyone could reproduce it.

Contains:
~Blender 3d File
~Arduino Sketch
~Python File (keyboard control)

Sep 282013
 

NEXT SESSION: TBD – (GMT-5) – RSVP

BlenderTutoringGooglePlusHangout

BLENDER G+ HANGOUT ON AIR:

I’m hosting Blender tutoring / instruction sessions on G+ Hangouts On Air for anyone who would like to attend.

The purpose of these sessions is just to provide some real-time assistance for people who would like to improve their Blender skills. For the time being these aren’t really planned lessons so much as just ‘some guy that might be able to show you how to do stuff in Blender’.

The format will just be me hanging out online and answering questions that pop up in the chat window (as much as I can anyway).

I can be of most assistance to those in the beginner to intermediate range. I have strengths and weaknesses in various areas so I may not be able to answer every question right off the bat, but even if I don’t know something specific, I might be able to point you in the right direction.

If you’re just getting started with Blender, you should probably start with some basic tutorials first, then if you run into some hurdles, I can probably help you over them.

These sessions are and will remain free, but if you really appreciate them, then I’ve put a Paypal link at the bottom of this page and it would super cool if you wanted to donate a little to defraying the cost of my internet connection and keeping me fed and the lights on and whatnot.

ABOUT ME:

I’ve been a regular Blender user for over 5 years and I’ve hosted classroom lessons and ‘labs’ for Blender users in the Baton Rouge and New Orleans area. I’ve helped a few people get from newbie to intermediate user and I really enjoy teaching Blender.

My portfolio is available on this site so you can see a little bit of what I’ve with Blender up to this point. I’m by no means the most qualified or advanced Blender user on the planet, but I’m a reasonably knowledgeable ‘generalist’. I’m very enthusiastic about Blender, and open-source, so I hope that hosting these sessions will be useful.

DONATION LINK:

If I’ve helped you a lot and you have a little to spare, please consider donating a little ‘fundage’ to the cause.
[paypal-donation reference=”Blender Tutoring”]

PRIVATE / GROUP SESSIONS:

If you would like to schedule a private tutoring session or a group lesson I would be perfectly happy to accommodate. I will have to ask for fee for these classes and ask that we schedule them at least a week in advance to ensure availability. I will ask for $15/hr for private sessions and $25/hr for group sessions.

These sessions can be on topics that you would like covered, assuming these are within my skill-set.

If you like, I can provide an introduction to Blender using a 6 part ‘Survey’ course (approx 2-hours each) that I developed for classroom instruction. Here is the outline for the sessions:

Session-1 – Introduction to Blender UI
Session-2 – Basic 3D Modeling in Blender
Session-3 – Materials, Textures, and Lighting
Session-4 – Animation and Basic Rigging
Session-5 – Blender Internal Rendering, Compositing, VSE
Session-6 – Physics: Particles, Cloth, Soft Bodies, Rigid Body Dynamics

I’ll also add the caveat that I consider myself more technician than artist. I can teach how to use Blender as a tool to use in the creative process, but I cannot teach artistic style. Let’s just say that if you saw what I can do with just a pencil and paper, you probably would not be impressed.

PREVIOUS SESSIONS:

Nov 10, 2013 – http://www.youtube.com/watch?v=PE2CsFUhb8g&feature=share

Nov 03, 2013 – http://www.youtube.com/watch?v=PJ16ZuLjwhs&feature=share

Oct 23, 2013 – http://www.youtube.com/watch?v=V0YW6iETUhY&feature=share

Oct 20, 2013 – http://www.youtube.com/watch?v=zDVz41OuceE&feature=share

Oct 16, 2013 – http://www.youtube.com/watch?v=7c6JYrh7H00&feature=share

Oct 13, 2013 – http://www.youtube.com/watch?v=BpQVP8prFlU&feature=share

Oct 09, 2013 –  http://www.youtube.com/watch?v=zXwcpTHgYaE&feature=share

Oct 06, 2013 – http://www.youtube.com/watch?v=xa-OW3kqWCU&feature=share

Oct 02, 2013 – http://www.youtube.com/watch?v=h-vSEALysaI

Mar 232013
 

I just had to 3d print something, so I did!

3dPrintBOTH

3dPrintSET

 Actually their names are ‘Hedwig’ and ‘The Angry Blender Unit’.

They were ‘progranimals’ hopping around in the BGE. Now they are little figurines standing perfectly still in the real world. Fun!

Mar 072013
 

RagdollRBD-POST

The folks at Blender have given me a couple of new tools with which to satisfy my desires to maim and mutilate ragdolls.

Rigid Body Dynamics in the animation system and Cycles Hair Rendering.

So in honor of that or whatever… here’s my first non-game-engine ragdoll (with hair) for your demented pleasure…

http://funkboxing.com/wordpress/wp-content/_postfiles/ragdollRBD-POST.blend

Aug 202012
 

I guess I’ve been using Blender for so much for so long that I tend to look for ‘Blender-like’ controls in a/v projects. So inevitably when I started working with LED strips I immediately tried to weasel out of having to think through functions and loops in arduino code to create effects I could do intuitively in Blender.

So after a few bad UI attempts I thought – hey, wish I could just design a light sequence in Blender and run it with ALT-A. So that’s what I did.

On the arduino side it’s using the FastSPI and CmdMessenger libraries for LED and serial communications.

The Blender script just reads the diffuse color in r-g-b from each LED objects material and spits it out to the USB port. Getting the pyserial library hooked up in Blender wasn’t a breeze but the “sys.path.append” line should help anyone having the same issues I did.

Here’s the arduino code and Blender file

(Using Arduino Duemilanove 328 and LED strip with WS2801 chips)

EDIT:

Blendernation article (Thanks Bart!)

I forgot to mention I’m using Ubuntu so the sys.path.append thing wont work for windows, you’ll have to find the pyserial library solution elsewhere (there’s plenty of reference out there)

Also – the script runs on each frame change. Here’s how that works (WARNING: kinda hacky) http://funkboxing.com/wordpress/?p=236

QUESTION: For any API guru’s out there – currently this script opens and closes the serial port on each framechange. I know this is radically inefficient. Any ideas on how to keep the serial port open persistently but to close it when blender closes?