Oct 152013
 

I had a little trouble finding references to how to setup multiple strips with FastSPI2, so I thought I’d post this.

You just use an offset value like in this example:

LEDS.addLeds<WS2801, 7, 9,   RGB>(leds, 43);       //<---Strip1 - WS2801 - 43 LEDs
LEDS.addLeds<WS2801, 11, 13, RGB>(leds, 43, 12);   //<---Strip2 - WS2801 - 12 LEDs
LEDS.addLeds<WS2811, 5,      GRB>(leds, 55, 16);   //<---Strip3 - WS2811 - 16 LEDs

In the additional strips the first integer passed becomes the offset value and the second is the number of LEDs in the strip.

LEDS.addLeds<STRIP, CLK_PIN, DATA_PIN, RGB_ORDER>(ARRAY, OFFSET, LED_COUNT);
Oct 032013
 

[EDIT] Please check out the newest version of the FX Code (v0.51) with Android Bluetooth Control App and Chrome Control Extension.

[EDIT] Fixed a really dumb problem in the Arduino code, added a color picker to the python GUI, and uploaded a new video demo. The problem was I was using if (serial.available()) and should have been using while. That gummed up the works and made the LEDs flicker if you moved the sliders too fast. That’s fixed now. Should have waited and tested better but I was all excited to get this posted- live and learn, or more likely just repeat the same mistakes and correct myself as I go along.

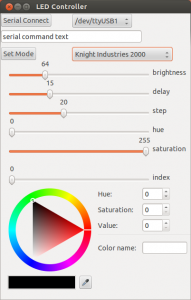
Here’s another revision to the FastSPI2 effects demo code. Some code cleanups, a few new effects, and a python GUI (gtk). GUI can select effect by name and control brightness, delay, color-step, hue, and saturation of various effects.

Screenshot from 2013-10-03 19:52:46

Here’s the Arduino Code

Here’s the Python Code


If you find this really useful, please consider donating a little to the cause. Thanks!

[paypal-donation reference=”FastSPI2 LED FX Code”]

I’m also grateful for bitcoin donations to: 1K5Yy77ejes2FZrHBG5fns3QAicnwZcduq