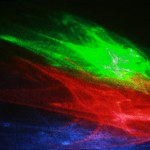
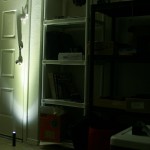
Aim the camera at the floor, set for a long-exposure, turn off the lights and shine some lasers through textured glass…
Sep 142013
Aim the camera at the floor, set for a long-exposure, turn off the lights and shine some lasers through textured glass…


So here’s my review of the Hexbright – Open Source Flashlight
• It’s insanely bright. You really have no idea. Seriously impressive.
• Good and solid, yeah. Perfect fistful of flashlight but still goes in the pocket. It’s not a mace like a big maglight but you would not want to be cranked upside the head with this. You could drop it on a bare foot without fracturing anything, but you’d remember not to do it again.
• Battery life seems good. Haven’t stress tested but no complaints yet.
• Simple, rugged construction. Twist off end pulls all the guts out of the aluminum and you’ve got access to the board, battery and LED, no problem.
• Nice beam! The single LED and lens give a really unexpectedly beautiful spread. A little hot in the center but it is a flashlight…
• Color temperature – 5380K – just shy of daylight. Meter also showed a tiny green spike in high mode but not noticeable with the eye. Easily color corrected with a little gel.
• Programming – easy to get started (but to be fair I’m pretty experienced with Arduino). Just had to load the board file and I was off and running. Loaded a couple of examples and pretty soon I was adding code the factory firmware. This is where having a ‘programmable’ flashlight is really cool. So for instance I didn’t like the fact that I had do cycle from LOW-MED-HIGH to turn the light off. So I added some code to where a long press after LOW or MED will turn the light off. Lots more possibilities here.
• Overalll: It’s an amazing flashlight and it’s open-source! Get one!
Images
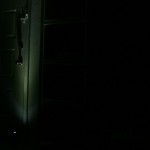
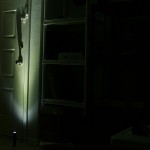
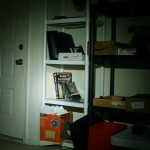
Canon EOS 400D
1/4 s | f/4.0 | 28mm | ISO 400 | Daylight (5200K)
OFF | ULTRA-LOW | LOW | MEDIUM | HIGH


Here’s my hack at the firmware. Adds an ‘ULTRA-LOW’ mode, and a ‘DAZZLE’ mode. Also long-press will turn the light off from any mode.
[EDIT] Please check out the newest version of the FX Code (v0.51) with Android Bluetooth Control App and Chrome Control Extension.
This code has been revised and I made a new post about it – please see updated post HERE
[EDIT] If you end up using this code for a project please send me a link/pics/video! I love seeing what people do with this! If you like I’ll post a link to your project on the FastSPI FX – User Coolness post. Also make sure to thank Daniel Garcia (the genius dev of the FastSPI library) on the G+ FastSPI Community.
[EDIT] If you have any requests for certain types of effects I’d be happy to look into it. Just let me know what you’re looking to do and I’ll take a swing.
If you find this code very useful please consider donating a little via paypal. I’m having some ‘financial instabilities’ right now and any little bit would help. And if you need a certain effect coded, a donation would certainly obligate me to get that working for you! Sorry for this, it sort of feels like panhandling and the real credit should go to the library creator, but we do what we have to… Thanks for understanding.
[paypal-donation reference=”FastSPI LED FX Code”]
I’m also grateful for bitcoin donations to: 1K5Yy77ejes2FZrHBG5fns3QAicnwZcduq
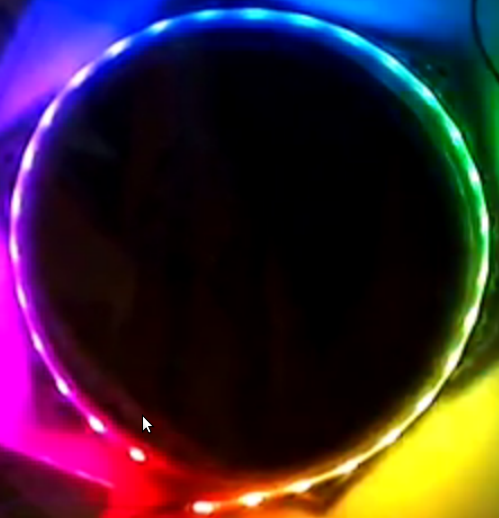
Some LED effects I’ve written for Arduino and FastSPI library.
Mostly written for a circle of LEDs but plenty useful for any configuration.
Code available here… the code
***Here is an update to the FastSPI_2_RC1 – the code
Used WS2811 strip, but have also tested with WS2801.
I’ve only tested this on the duemilanove and nano boards. It’s looking like this does not work on the UNO and I’m not sure about the Leonardo or the new Due.
Several people have indicated problems finding the SerialCommand library – so here’s the version I’m using SerialCommand
Here’s where I found it. Thanks to this guy for the library- Steven Cogswell
http://husks.wordpress.com/2011/05/23/a-minimal-arduino-library-for-processing-serial- commands/
http://youtu.be/Jcs1udKP4rs

I guess I’ve been using Blender for so much for so long that I tend to look for ‘Blender-like’ controls in a/v projects. So inevitably when I started working with LED strips I immediately tried to weasel out of having to think through functions and loops in arduino code to create effects I could do intuitively in Blender.
So after a few bad UI attempts I thought – hey, wish I could just design a light sequence in Blender and run it with ALT-A. So that’s what I did.
On the arduino side it’s using the FastSPI and CmdMessenger libraries for LED and serial communications.
The Blender script just reads the diffuse color in r-g-b from each LED objects material and spits it out to the USB port. Getting the pyserial library hooked up in Blender wasn’t a breeze but the “sys.path.append” line should help anyone having the same issues I did.
Here’s the arduino code and Blender file
(Using Arduino Duemilanove 328 and LED strip with WS2801 chips)
EDIT:
Blendernation article (Thanks Bart!)
I forgot to mention I’m using Ubuntu so the sys.path.append thing wont work for windows, you’ll have to find the pyserial library solution elsewhere (there’s plenty of reference out there)
Also – the script runs on each frame change. Here’s how that works (WARNING: kinda hacky) http://funkboxing.com/wordpress/?p=236
QUESTION: For any API guru’s out there – currently this script opens and closes the serial port on each framechange. I know this is radically inefficient. Any ideas on how to keep the serial port open persistently but to close it when blender closes?
Here’s an Arduino LED backlighted sign I made.
Electronics are:
(1) Arduino Nano – $16
(1) Bluetooth TTL- $10
(23) Addressable LED Strip (SMD5050/WS2801) – $20
Then some foamcore, paint, and hot glue.
I’m using a android bluetooth terminal program to send serial commands to the arduino. Right now the program just calls ‘Modes’, which are different effects I hacked together in the arduino IDE. Later I’ll write a more versatile program so you can more directly control the LED’s with an Android app or something.
FYI – The Q is for Quixote Studios.