Feb 212020
 

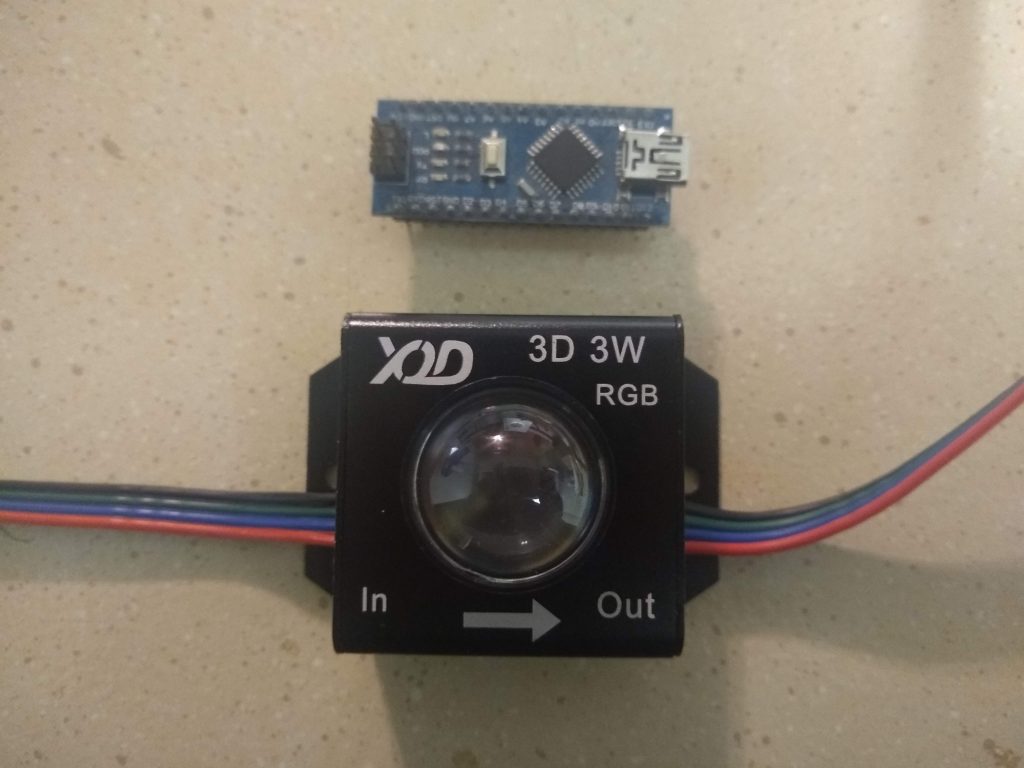
I was searching for a high power addressable LED module and this was one of the few I found in a price range I could play with, and being 5V instead of 12V is convenient for me. They were $15 for 5 unit plus shipping.

https://www.aliexpress.com/item/33035867933.html

UCS1903/WS2811
DC5V
IP40
5deg Beam Angle

Nano for scale

Only found them on Ray Wu’s AliExpress store, can’t find them anywhere else. It took a few weeks for delivery but it was reasonable for international shipping.

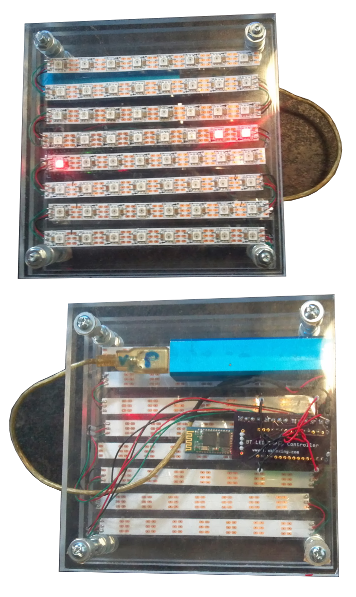
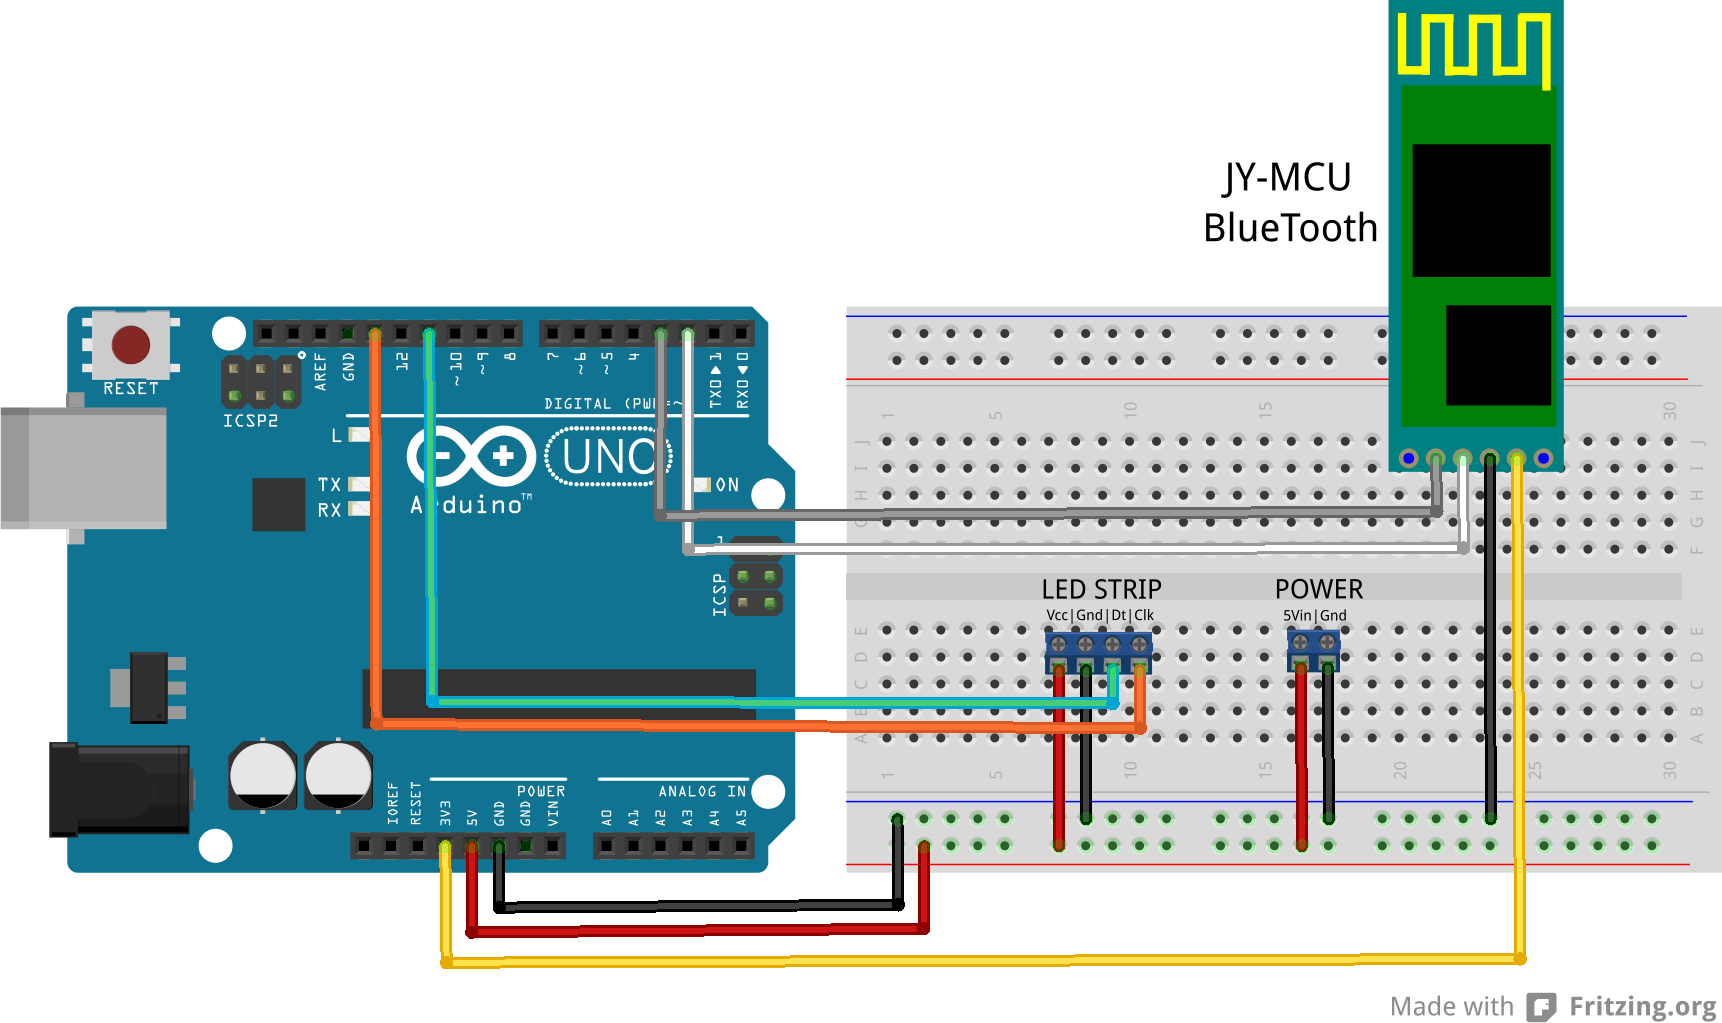
They’re basically what I expected, they worked right out of the box with FastLED test code (WS2811\GRB). I’ve been using 2812’s for so long I was briefly confused by the 4th wire and was worried they were just common anode RGB. But they’re WS2811’s for sure.

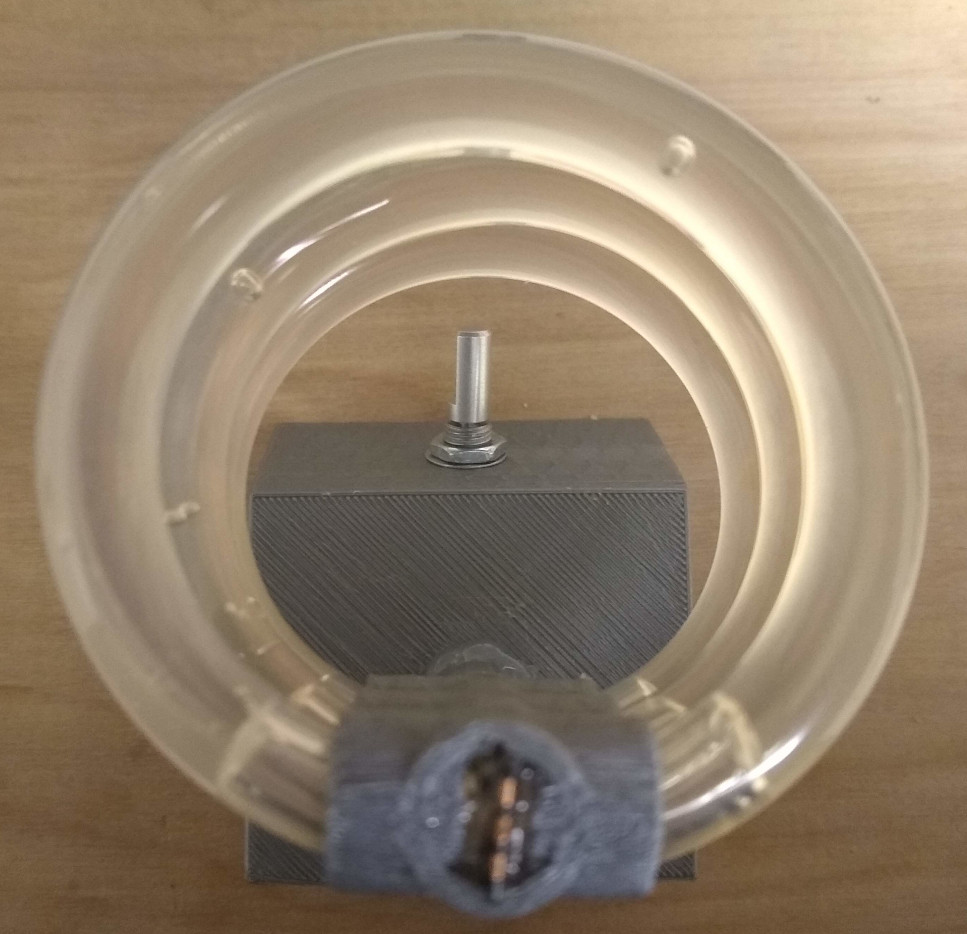
I opened one up and should have taken a picture but forgot. The only things worth mentioning are that the lens is glued to the PCB and protrudes from the housing so you cannot remove the board from the aluminum block without breaking off the lens somehow, which is likely to damage the PCB. Also it’s notable to me that the aluminum housing won’t help cool the PCB at all, it’s held in a channel in the middle but doesn’t have any thermal connection to the aluminum. That seems like a missed opportunity.

As far as the light goes- they’re very, very bright. Incomparable to a standard LED strip LED, it’s a bitty freaking light cannon. I can see them being used for architectural displays that would be visible even with lots of ambient light. The video is with my apartment lights on and the FastLED brightness at 128, about 1/2 power.

The thing that I didn’t expect was the projection effect. It’s kind of bizarre and probably why these things aren’t as popular as they could be. If you watch the video you’ll see what I’m talking about.

It projects an almost perfect image of the LED chip and you can clearly see the different positions of the red\green\blue LEDs. It makes it pretty much unusable for direct illumination of anything, at least from close up. You have to bounce this off of something or it’ll be unbearable to look at. It might help to test 20-30ft away, but my apartment isn’t that big and my neighbors already think I’m nuts so I’m not doing outdoor testing right now.

Unfortunately that kind of defeats the purpose of a tight beam for me. Might as well just get a better diffused light if I have to bounce it anyway.

So I’m not sure where to go from here with there. Since I’m already going crazy with tubes I might see if I can use these for a giant silicone tube light or something. We’ll see what happens, but I was pretty excited to get them in and test them so I thought I’d share.

Feb 152020
 

Heinlein, Musk, Groening… true human visionaries understand that what the world needs now is tubes, sweet tubes. So for the sake of humanity- here are more tubes.

I’m ending up with some odd lengths of scrap tube from my warp coil fetish and I thought they might look cool arranged vertically around a 12 LED ring. I could have done 12 tubes, but I went with 6 tubes using every other LED and the middle ones are a ‘base’ light. So you can have the translucent tube color accented against the reflected light off the center column.

It kind of works, but I need to add a little reflector\diffuser material to better point the ‘base’ light at the column, right now it kind of spills out everywhere and doesn’t evenly light the column. Still reasonably pleased with how it worked out so thought I’d post it.

Jan 182020
 

They’re warp coils now, not just tubes filled with stuff to create a lighting effect that kind of reminds me of warp coils- they’re actual warp coils.

There was a disappointing development with the test rig. A few days after I made it the silicon curing in the tubes shrunk up inside it and left a big air gap that screws up the light transmission around the tube. It stil looks okay but you see a lot of light blasting out the back that wasn’t there before.

I thought about trying again but filling up the printed holder with silicone too when it shrinks up it pulls in more silicone, but I’m not sure that would work or would be worth it, and it’s messy enough as it is.

The more obvious solution is just fill the tubes and let them cure, then cut the tubes down where the silicon shrinks to and jam that into the LED. It’s not as ideal as letting the whole thing cure in one clear continuous mold, but I’ve noticed the interface between the LED and tube filling isn’t as critical as I thought. A perfect seal with the silicone seems only about 10% better than just jamming the silicone in after its cured. Obviously that’s just me ballparking it based on observation so who knows. I think if there is something to be gained in a perfect interface between LED and waveguide then it’s so unattainable it’s not worth the effort past just making sure they’re pretty well crammed in there with no big bubbles or gaps. But since I had the silicone out I figured I’d try to get creative and tried a few things:

~Air: Probably should have started with this but for some reason I never tried it. The fact that it doesn’t work doesn’t excuse the fact that I should have tried earlier.
~Water: Sealed water in the tube with silicone.
~Fluorescent Water: Soaked a yellow highlighter in hot water and sealed that in the tube with silicone.
~Water So Fluorescent it’s Opaque: Soaked 5 colors of highlighter in hot water… more is not always better.
~Silicone: Clear silicone again. This time cured and cut before installing.

In the ring tower from bottom to top it’s air, yellow fluorescent water, and silicone.

The water tube leaked a bit when bent into a circle so I put it on the older tube tester. The fluorescent cocktail is just kind of gross. Maybe a lighter solution might work better, but I think I’m just going to count that as a total fail and pretend I never did that.

~Air: Apparently air is worthless, it obvious doesn’t refract light enough. There’s no value to air whatsoever, never use air for anything.

~Water: Water doesn’t seem to work as well as silicone, but it’s not a fair test because I’m guessing how it would look with both ends lit. I don’t think water has any advantages for the warp coil effect. It’s an equivalent or greater messiness and pain-in-the-neck factor with silicone and doesn’t work quite as well. Working with water adds the possibility of a spill killing the board, but silicone actually waterproofs everything. Also the interface between LED->Silicone->Water is probably why it doesn’t work, and it feels like it kind of defeats the whole purpose. The only thing I can think to use is that it’s a liquid so could be used for snow-globe particle effects stuff. If I could keep the bubbles small it might be interesting, but any air forms one bubble and does this action here. Kind of cool how it creates the swimming pool lighting effect when it reaches the LED, but idk how to use that right now.

~Fluorescent Water: The yellow is an interesting effect. I think I’m seeing a bit of a luminance spike in the yellow\red range but I’m not sure how much of that is really UV being converted to visible light or how much is just the tint of the dye. In any case I don’t think it’s really worth the effort for this, but something to think about for special applications. The effect is only really dramatic when you compare under reflected light like these photos with the camera flash on and off:

Flash OFF
Flash ON

~Silicone: Just looking at the tubes it seems like silicone has the highest index of refraction. I think that’s a desirable characteristic for waveguides but I’m not sure to what extend it matters since I’m doing zero calculations and this is really just artistic diffusion and I’m not even sure if I’m using the term waveguide correctly in this context. Anyway it seems like silicone is the highest and that’s the best. Also it clearly just looks better in the rig to me. Only problem is now when I look at them I can’t stop thinking they’re shower curtain rings.

And since silicone is clearly the superior material I went ahead and cut down the rings from the first test and jammed them back in the LEDs. The rings are a little small now but I’ll remake it all later. But here’s a video of the rig with the cured silicone and slightly modified demo code including an actual warp coil effect for these actual warp coils.

Jan 112020


So here’s a little test of a ‘waveguide’ effect for LEDs.

This uses 5/8″ tube filled with clear silicone and I think it worked out pretty well. The video doesn’t capture the effect perfectly, it’s a little blown out, but you can get the idea that the light is being carried around the ring and looks a bit like it’s fluorescing from the liquid.

I started thinking about this awhile ago and finally got around to putting it all together. I initially started by trying to do tests with little sections of tubing attached to LEDs. Tried a few kinds of caulk and silicone but the only thing that really popped was the super clear silicone.

There’s a few tricks to the process. You have to fill the tube without any bubbles, which takes a bit of practice, patience, and elbow grease with a caulk gun. Then you have to smash the tube over the LED with enough excess to displace air and not allow any bubbles to form in between the LED and the tube, which blocks the light and dims the tube a lot. And you have to secure the tube to the LED to allow it to cure.

The simplest way to do all this was to just design and print the connector I had in my head for if the lighting effect worked. I made one section of tube and it looked pretty good, so I made this one with three sections.

The back ‘spine’ is hollow with a WS2812 strip doubled over so there’s an LED pointing left and right into each section of tube. The ‘waveguide’ carries light a few inches, enough for several configurations, but it can’t really replace EL wire or anything.

I didn’t include any STL’s or code because the silicone and acrylic is the trick, everything else is pretty simple to reproduce if you do this kind of thing, and if you don’t you should do that first before you start getting covered in silicone while playing with electronics.

Not sure why the video isn’t embedding but here it is.

https://youtu.be/fN1kAN9xcQ0

Jun 142015
 

So here’s something I should have posted quite awhile ago. This is a ‘breakout board’ I made for controlling LED strips with Arduino over bluetooth or USB.

PCB

It’s a little PCB for an Arduino nano, bluetooth chip, and (3) 4-pin terminal blocks with PWR-GND-SN-CK, and a 2-pin block for PWR-GND input. It can be used with 3 or 4 pin LED strips, or anything really, servos, sensors, whatever. I designed the PCB using Fritzing and had it printed through OSH Park. If you’re interested in one let me know via the funkboxing contact form. I’ll offer just the bare board or a pre-soldered and tested version with a nano, bluetooth chip, and terminal blocks, or any variation thereof. I can’t really come up with a price that makes sense, so if you tell me what you’re planning on using it for and I think it’s cool I’ll probably give it to you pretty much at-cost.

And here’s an LED array I made with it.

Array

It uses (64) WS2811 LED’s in an 8×8 array, an Arduino Nano, bluetooth chip, and a USB battery pack. It’s a double-decker sandwich of (3) 1/2″ thick acrylic plates so the whole rig is excessively large and heavy, but I kind of meant for it to be that way. I wanted something as a little testbed for 2D effects, of which I’ve only made a few so far. I’ll post the 2D array code at some point, but I should clean it up and make sure it works with the newest FastSPI library first.

Dec 312013
 

I’ve had a few people contact me and let me know they’ve used the FastSPI library and my demo FX code. They are some really cool projects! I really appreciate it when people show me what they’ve done with the code so I thought I’d make a little post to show off some of their work. If the demo FX or control code has helped you out or you’ve used it in your project, please let me know and I’ll post it up here too.

—Infinite Mirror—
https://plus.google.com/u/0/photos/+JoelByrnes/albums/5960030359929303905

—Burning Man Bathroom Beacon—
bathroombeacons.org

—Deadmou5 Helmet—
http://www.youtube.com/watch?v=54kcM61WNJk
http://www.youtube.com/watch?v=_zYVDaq0X-A

—Mermaid Costume—
 https://plus.google.com/u/0/102483892501686823436/posts/Uq2VYfcTD5p


Nov 102013
 

[EDIT] Here is a link to an update of these effects made by Stefan Mayer designed to work with the OctoWS2811 LED Library. Thanks a lot Stefan, great work!

[EDIT] I’m planning to clean up the Android control app source and put it on github, but in the meantime here’s the code.

[EDIT] If you end up using this code for a project please send me a link/pics/video! I love seeing what people do with this! If you like I’ll post a link to your project on the FastSPI FX – User Coolness post. Also make sure to thank Daniel Garcia (the genius dev of the FastSPI library) on the G+ FastSPI Community.

Here is an update to the Arduino FastSPI2 FX demo code (v0.51). I’m also introducing an Android Bluetooth Control App and a Chrome Extension.


I’ll continue to work on improving these programs but I think I have them to a point where it might be useful to some people- so here they are!

Here is the Arduino Sketch (v0.51)

Here is the Android App on the Google Play Store (v0.1a)

Here is the Chrome LED Controller Extension (v0.1)

— — — SETUP / NOTES — — —

ARDUINO:
– This version uses the Software Serial library and FastSPI2 library. Also the default serial speed is now 57600.
– The following is a breadboard layout and schematic for setting up a JY-MCU Bluetooth chip with an Arduino (Duemilenove or Nano) to drive a strip of addressable LEDs. This should work with any LED strip that is supported by FastSPI2 RC4 and later.
ArduinoBTLEDSimple_011_breadboard_bbArduinoBTLEDSimple_007_schematic_schem

ANDROID APP:
– To control LED strips via the Android app you’ll have to pair the JY-MCU module with your smartphone/tablet in the Bluetooth/Wireless settings. The PIN for these modules is usually 1234.

CHROME EXTENSION:
– To load the extension, unrar the file to a directory. Then in Chrome go to Settings>Extensions>Load Unpacked Extension. Then select the directory. Then you can launch it from there.
– This extension has been tested on Ubuntu 12.04 and WindowsXP. For Windows you’ll have to install the USB Serial drivers, but the automatic driver search seems to work fine for this.

— — —

If you find this really useful, please consider donating a little to the cause. Thanks!
[paypal-donation reference=”FastSPI2 LED FX – Android/Chrome”]

I’m also grateful for bitcoin donations to: 1K5Yy77ejes2FZrHBG5fns3QAicnwZcduq


Oct 152013
 

I had a little trouble finding references to how to setup multiple strips with FastSPI2, so I thought I’d post this.

You just use an offset value like in this example:

LEDS.addLeds<WS2801, 7, 9,   RGB>(leds, 43);       //<---Strip1 - WS2801 - 43 LEDs
LEDS.addLeds<WS2801, 11, 13, RGB>(leds, 43, 12);   //<---Strip2 - WS2801 - 12 LEDs
LEDS.addLeds<WS2811, 5,      GRB>(leds, 55, 16);   //<---Strip3 - WS2811 - 16 LEDs

In the additional strips the first integer passed becomes the offset value and the second is the number of LEDs in the strip.

LEDS.addLeds<STRIP, CLK_PIN, DATA_PIN, RGB_ORDER>(ARRAY, OFFSET, LED_COUNT);

Oct 032013
 

[EDIT] Please check out the newest version of the FX Code (v0.51) with Android Bluetooth Control App and Chrome Control Extension.

[EDIT] Fixed a really dumb problem in the Arduino code, added a color picker to the python GUI, and uploaded a new video demo. The problem was I was using if (serial.available()) and should have been using while. That gummed up the works and made the LEDs flicker if you moved the sliders too fast. That’s fixed now. Should have waited and tested better but I was all excited to get this posted- live and learn, or more likely just repeat the same mistakes and correct myself as I go along.

Here’s another revision to the FastSPI2 effects demo code. Some code cleanups, a few new effects, and a python GUI (gtk). GUI can select effect by name and control brightness, delay, color-step, hue, and saturation of various effects.

Screenshot from 2013-10-03 19:52:46

Here’s the Arduino Code

Here’s the Python Code


If you find this really useful, please consider donating a little to the cause. Thanks!

[paypal-donation reference=”FastSPI2 LED FX Code”]

I’m also grateful for bitcoin donations to: 1K5Yy77ejes2FZrHBG5fns3QAicnwZcduq

Sep 212013
 

[EDIT] Please check out the newest version of the FX Code (v0.51) with Android Bluetooth Control App and Chrome Control Extension.

[EDIT] Revised once again, and made a python GUI. See this new post.

This is a revision of the original FastSPI LED Effects Examples I wrote awhile back.

LED_POST

I’ve gotten some very positive responses for these examples so I figured I should update them to be a little less clunky (the operative term here being ‘less’, they’re still quite clunky) This revision will work with RC3 of the FastSPI2 Library.

http://youtu.be/5c6vYoZInjw

These are little LED displays I made, one is a circular back-light and the other a wave shape with a little diffusion in front. Both are Arduino powered of course. I just ran the ‘demo mode’ on both and tried to start at the same time so they’re not in sync or anything. Just thought I’d show them on a couple of different configurations for the heck of it.

If you have any issues getting this to work please check through the comments on the original post page first. A lot of people have posted very helpful comments about their experience using the code that might help you on your way. And of course feel free to post your issue if you can’t find a solution- I’ll do what I can to help.

Most significantly I’ve removed the need for the SerialCommand library and the really hacky HSV->RGB conversion function in favor of the native FastSPI2 conversion which is much faster and cleaner and supports ‘rainbow’ and ‘spectrum’ modes (though for these examples I just stuck to ‘rainbow’.)

I also added one example of a ‘native’ FastSPI effect; the fill_rainbow function (new_rainbow_loop – mode 88). This is similar to the ‘rainbow_loop’ function except that is fades the colors into one another much better. I’ll add more ‘native’ effects functions like fades to the code later because they are much faster and have nicer aesthetic qualities than mine.

Change modes the same way as in the previous code, enter ‘m’ and then an integer for the mode number (listed in code). Also make sure you send a NEWLINE character. Mode 888 is ‘demo mode’ which cycles through all the modes, but this tends to block the next serial command.

Also you can change the maximum brightness with ‘b’ and then an integer from 0-255. By default it’s set to 64, about 1/4 brightness.

Here is the code.

[EDIT] I recently fixed a few issues where I messed up the HSV conversion and I utilized a few more of the FastSPI2 functions. Also finally started giving the code a version number. This one’s v0.3, I’ll do better with that in the future.

Most notably I added the ability to adjust parameters of many of the effects via serial commands. The following commands are now accepted:

(d)elay 0-INF | d50 | Adjusts the delay value, effects run faster or slower.

(s)tep 0-INF | s5 | Adjusts the steps between colors, mostly for rainbow effects.

(h)hue 0-255 | h180 | Adjusts the hue of effect, mostly for one and two color effects.

sa(t)uration 0-255 | s50 | Adjusts the saturation of effect, mostly for one and two color effects.

Here is the code. (v0.3)

If you have any requests feel free to ask, I’ll see what I can do! I’m more-or-less open for business if you have anything in particular you need tackled. And if you find these very useful, please consider donating a little via. paypal, I’d really appreciate it 🙂

[paypal-donation reference=”FastSPI2 LED FX Code”]

I’m also grateful for bitcoin donations to: 1K5Yy77ejes2FZrHBG5fns3QAicnwZcduq